With the "Mobile time tracking" module, Staffcloud offers you the option for employees to check themselves in and out in real time.
This function is available in three modes:
- Time stamp submissions with or without location information
- Validated check-ins by scanning a provided QR code
- Validated check-ins by scanning an NFC tag
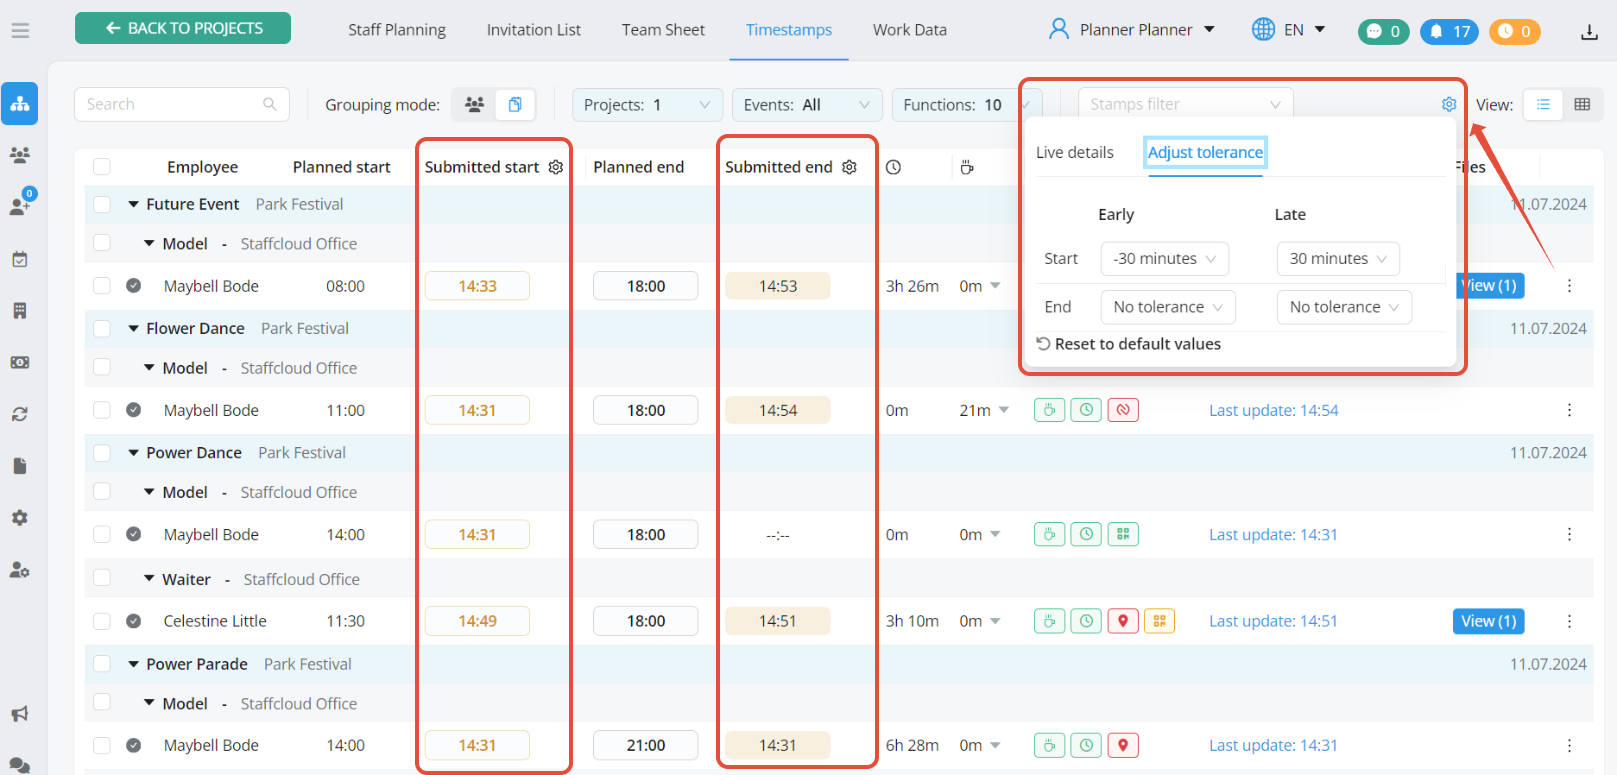
The planner view in the "Time stamps" tab
Planners can view the submitted timestamps and check-ins in real time in the "Timestamps" tab.
This tab offers special functions and filter options: In the centre above the table, you can filter for complete or incomplete data entries.
The tolerance times can be adjusted on the right above the table. These control the background colour of the submitted times:
| transparent | the time stamp or check-in is within the tolerance period |
| yellow | the time stamp or check-in is not within the tolerance period and the assignment is still in progress according to planned times |
| red | the time stamp or check-in is not within the tolerance period and the assignment has ended according to planned times |
Validation of the submitted work data
This validation is displayed in the table with the symbols in the respective data entry:

The time and location are validated for timestamps. For check-ins, the time and level of the QR code or NFC validation are validated. The validation is carried out individually for each submitted working time and the 'worst' value per use is displayed in the overview. Details on the respective validation open when the cursor points to one of the validation icons.
It is possible that both time stamps and check-ins are permitted for an assignment, and therefore time, location and QR codes or NFC validation are validated in the overview.
To view the individual work times of an employee, click on the link in the "Reporting Details" column of the respective data entry:

Location
In the detail view, there is a location icon with a map showing the respective location for each time stamp with location transmission.
If a location has been submitted for a working time, a location icon is displayed in the validation column. The colour of the symbol indicates the validation status of the location:
 | green | valid location - the submitted location matches the event location (radius of 500m of the event location) |
 | red | invalid location - the submitted location is not within a radius of 500m of the event location or no location has been submitted |
Time
A validation of the time is specified for each data entry. The colour of the symbol indicates the status of the time validation:
 | green | valid time - the submitted time matches the time entered in the database log (60 seconds deviation allowed) |
 | red | invalid time - the submitted time does not match the time entered in the database log (60 seconds deviation allowed) |
QR Code / NFC
The QR code or NFC validation is validated for each check-in. The colour of the symbol indicates the validation status of the QR code or NFC validation:
 | green | valid QR Code or NFC validation - the submitted QR Code or NFC validation corresponds to the configured level or a level below, i.e. for the configured level "Project", the QR Code or NFC validation is also validated for the scheduled function |
 | yellow | valid QR code or NFC validation from the instance that does not correspond to the configuration - the submitted QR code or NFC validation does not correspond to the configured level or a lower level for the current application, i.e. the QR code or NFC validation for the project is not fully validated for the configured "Event" level |
 | red | invalid QR code or NFC validation - the submitted QR code or NFC validation does not originate from the instance or originates from an incorrect project, event or function |
Transferring submitted working times to the work data
Before you can transfer the submitted times to the work data, select the relevant times for each data entry in the overview. The times that are selected with a frame in the overview are transferred to the work data.

The default setting for the selected times can be adjusted in the "Live details" on the right above the table. This setting is saved and is automatically applied the next time a project is called up in the Timestamp tab.

The following options are available for the standard settings for start time, pause times and end time: 
The selection of times can also be made column by column for the start and end time:

Manual adjustment of individual data records is possible by clicking on the desired time. If several times are available for a time, these are displayed as soon as the cursor stops over a time and can also be selected by clicking on them.


Transfer a single data record:
Select the data rows to be transferred and click the green "Create live proposal" button at the bottom of the screen.

Work report in the work data
As soon as the data has been transferred, it appears as a live proposal in the "Work data" tab. The live proposal is automatically accepted and can be made visible again in the work data using filters:

Read more about configuration of check-ins and timestamps
Read more about employee´s view
Was this article helpful?
That’s Great!
Thank you for your feedback
Sorry! We couldn't be helpful
Thank you for your feedback
Feedback sent
We appreciate your effort and will try to fix the article