In this article, I will learn how to configure an export template so it can be used for direct (embedded) exports in Staffcloud – including linking to records, setting filters, and assigning the correct context.
Important note on Exports in Staffcloud:
In Staffcloud, every user with the appropriate permissions can create, configure, and use their own export templates. This is a unique strength of our system and unlocks powerful possibilities – from simple lists to complex, highly structured data exports.
Because exports in Staffcloud are very powerful but also technically complex, the related guides and tutorials are intentionally detailed and technical. Please take your time, be patient with yourself, and follow the step-by-step learning path across multiple articles that we have prepared to build up your knowledge in a structured and sustainable way.
To fully understand and correctly use exports in Staffcloud, we recommend working through the following solution articles in the given order and trying out the examples in parallel in your own instance:
- [WIP] Recommended settings in Staffcloud and on your device (Excel)
- Exporting Staffcloud-Data
- Creating Export Templates
- Creating Export Templates: Column Configuration
- [WIP] Creating Export Templates: Search form Configuration
- Direct Exports: Using Embedded Export Templates
- Direct Exports: Configure an Embedded Export Template → you are here!
You can also find a “construction guide” for frequently requested export templates in the following area: DIY Tutorials for frequently requested Export Templates
Jump to section [TOC]
- Embedding Direct Exports – Linking Templates to Data
- Step 1: Add the System ID Field to the Template
- Step 2: Configure a Filter for the ID Field
- Step 3: Assign a Context – Link ID Field to Direct Export
Embedding Direct Exports – Linking Templates to Data
Direct exports are based on regular export templates. Unlike classic exports, which rely on search filters, direct exports work with explicitly selected data sets – such as assignments (in the team sheet) or employees (in the invitation list or employee overview).
To make a template usable directly within a specific section – such as the team sheet – a few specific settings need to be applied in the export template configuration.
This can be done using a new export template or an existing one. To see how to open an export template and view the Resource Map, we use the existing export template "EMP – Data Sheet" of type Employee.

Step 1: Add the System ID Field to the Template
First, add the System ID field of the relevant ressource to the column selection of the template. It’s important to use the correct recommended export type and the corresponding System ID:
| Context / Page / Tab | Staffcloud Section | Recommended Export Type | System ID |
|---|---|---|---|
| Project Management | Projects | Assignments / Events | Project ID |
| Staffplanning Team sheet | Projects | Assignments | Assignment ID |
| Staffplanning Invitation list | Projects | Employees | Employee ID |
| Staffplanning Timestamps (with activated module only) | Projects | Assignments | Assignment ID |
| Staffplanning Work Data | Projects | Assignments | Assignment ID |
| Employee management (= Employee, Applicant and Candidates Overview) | Employees & Recruiting | Employees | Employee ID |
| External workers Management (with activated module only) | External Staff | External Workers / Employees | External Worker ID = Employee ID |
| Pay Run Pay Lines (with activated module only) | Finance | Pay Runs | Pay Run ID |
⚠️ Important: You must use the System ID, not a custom identifier!
If the resource or ID is not yet available in the template, it must first be added via Resource Mapping (accessed via the blue "Edit Resource Map" button).

The System ID is marked with a key icon in Resource Mapping – for example, the Assignment ID, which can be added under "Employee Assignments" by activating the checkbox.
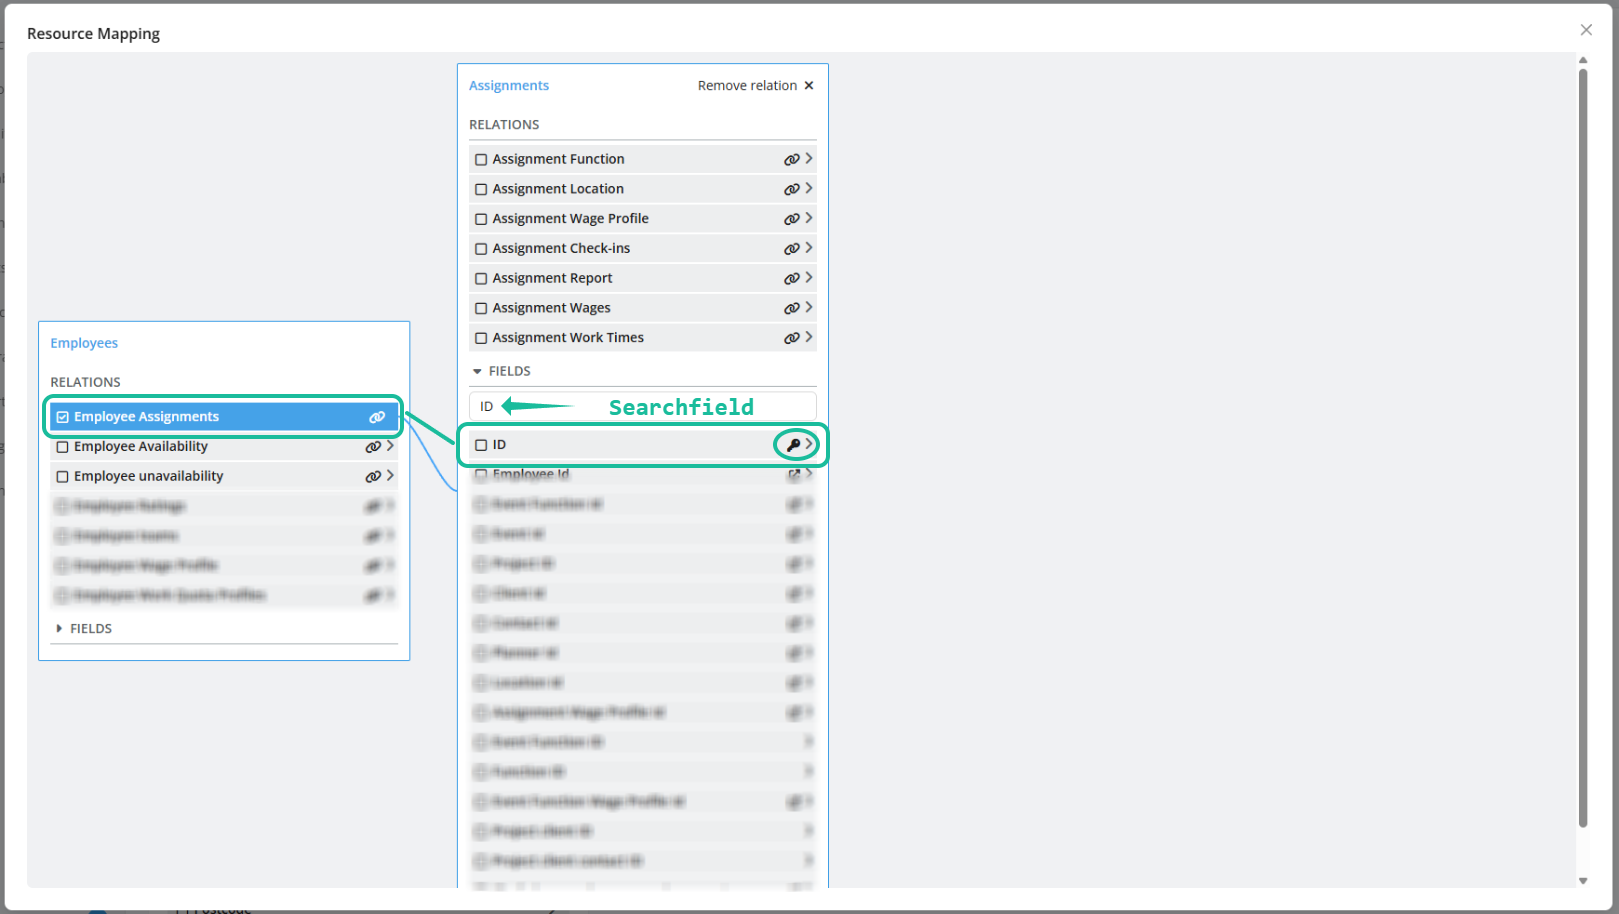
Tip: Use the search term "ID" within the resource (e.g. Assignment, Employee) to find the correct field quickly.
In the following example, we are configuring a direct export for Staff Planning – Team Sheet.

Step 2: Configure a Filter for the ID Field
Select the added ID field from the column list, then activate the checkbox in the right-hand panel:
Search Form → Searchable
The field type for System IDs is always set to "Text".
Additionally, the filter type must be set to "in" to allow the system to process multiple IDs from a list.

Optional: You can remove the ID field from the export output, as it’s usually not relevant for the reader.

Step 3: Assign a Context – Link ID Field to Direct Export
To assign a new or existing template to a specific context, open the Advanced Save Options.
Click on the three dots next to the "Save" button.

In the window that appears, you can:
Edit the template name
Select the appropriate context

Once a context is selected, two additional options appear:
"Default Template": Defines whether this template should be used as the quick export for the selected context (only one per context allowed).
"System ID" (e.g. "Assignment ID"): Enables the link to the selected records. Staffcloud automatically displays the required System ID based on the context but it still has to be manually selected from the list.

Don't forget to Save! Once the field is linked, the template can now process data directly within that context – such as from the team sheet.
Related articles:
Creating Export Templates: Column Configuration
[WIP] Creating Export Templates: Search form Configuration
Direct Exports: Using Embedded Export Templates
DIY Tutorials for frequently requested Export Templates
Was this article helpful?
That’s Great!
Thank you for your feedback
Sorry! We couldn't be helpful
Thank you for your feedback
Feedback sent
We appreciate your effort and will try to fix the article